Hello! Today, I wanted to reveal to you a cosplay that I made for FanExpo last year. This one took me months to make, and for the majority of the process, I had to create my own pattern or invent how the pieces would stay together and hold up. If you would like to learn my progress, then please keep reading.
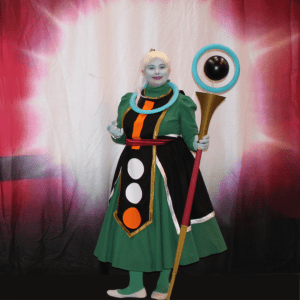
As you can see above, there is a lot that went into making this cosplay. I first broke it down into several different layers. First, the dress. This was probably the easiest of the whole thing. The most difficult part was finding what the sleeve type for the dress was called. After some research, I found that the closest sleeve time that I could find to the original was called a Juliet sleeve. Fortunately, I was able to find a pattern for this type on Etsy for pretty cheap. I also purchased the corresponding top pattern, even though I don’t care for sewing darts and it went really well. The fabric that I was using was some extra-wide cotton fabric that I got from Joann Fabrics before they closed (and I still miss them to this day). With that, I was able to use an online calculator to find out how to cut out a basic circle skirt and added a slit in the back for a zipper to make it easier to get on and off. The dress was also supposed to have a high neck collar. A lot of times these kinds of things choke me so I made one that was detached and had stripes to tie it to a width that was comfortable.
For the second piece, the black and white overskirt, I had to figure out how I could get it to sit right and stay up. While I was looking for inspiration, I found a pattern for a corset belt and that’s when the idea hit me. I could connect the black overskirt to the belt. The lacing would be hidden under the front part os it would work out perfectly. I wanted to be able to iron it so I made it out of a cotton fabric that I already had at my house. After following the pattern for the belt, I added some loops to the front to make it easier. At this point, I wish that I had added some boning to help it stay up, but at the time, I didn’t think about that. Afterward, I did a half circle skirt pattern and sewed it to the bottom and put it and the dress on the mannequin. The get the best idea how it would lay with the petticoat, I also put the petticoat on the mannequin and then cut the straight lines until I got it to lay how I wanted it. Using some white crepe-backed satin I had from a different project. I cut strips and used them to line the black piece and used white ribbon for the closure.
Now for the top center part. This took a little bit more work because I didn’t have a pattern for this. I first started out with how wide I wanted it to be and then the length of one side. I cut a half circle until I found one that would sit around comfortably with the dress. I added an extra seam allowance to one side since it would be connected on one side and there would be an overlap on the other side so that it could have a hidden snap. Fortunately the shapes were easy enough and I cut them out of HTV vinyl and applied them. I used some leftover gold crepe backed satin to do the edging and sewed it all together and added the snap.
For the red sash, I had some more left over red satin fabric from my Princess Daisy Cosplay so I cut a strip out that was extra wide, folded and sewed it and just tied it. The staff was 3D printed and assembled. It has a wood rod down the center to give it some stability and a clear acrylic rod to make it look like it is floating. The STL for this was just found on Thingiverse so I only had to pay for the filament.
To finish the look I bought some light blue gloves so I wouldn’t have to put face paint on my hands. Then added some water based face pain on my face and added a white wig and some purple metallic liquid lipstick and I was all done. For some contouring in the face I used some darker blue eyeshadow. Then used some white flats I had and bought green tights that matched dress and it’s all done!
I’ll talk about this in a future post but this cosplay actually won best runner up in a cosplay contest! If you would like a more detailed view of each section check out my youtube channel or click the links below.
Planning The Cosplay
Making The Dress
Making The Tunic
Making The Overskirt