Tomorrow is National Boss Day. Are you stumped on what you can make to show your boss some appreciation? Today I am going to show you an inexpensive gift that you can make for your boss. If you know that they like coffee or cold beverages then you can make them this awesome cup. I have two different versions that you can use.
Category: Uncategorized
Make a Shirt with Glitter HTV like Pro
This tutorial is going to show you step by step how to make a shirt using Glitter HTV. Without further ado, let’s get right in.
First, you want to start with the image that you are going to use for your shirt. I found this lovely pinup girl and then added a sentiment that I really liked. Once you have everything all set up click the make it button.
Then we want to make sure that it is on there just how we want it. This is important: DO NOT FORGET TO MIRROR THE IMAGE!
Because glitter HTV is thicker than traditional HTV we need to have it on a different setting. So you want to hit the continue button then set your Cricut to the custom setting. When you do so you will see this:
You then want to click browse all materials and search for glitter iron-on.
When you have done that you will see a screen like this:
This is your chance to check all of your settings to make sure they are where they are supposed to be. If you notice there is a pressure drop-down box. You can decide if you want it to be a default, light, or heavy pressure. The Siser glitter HTV is very thick so I opted for heavy pressure. Now you need to get your vinyl ready. I used the guide on the digital cutting mat and cut my vinyl 11 X 5.5. I then applied it shiny mat shiny side DOWN. Always apply the shiny side of the vinyl against the mat.
Then you want to load your mat and start to cut. Depending on how intricate your design you wait for it to finish cutting.
So now that it is all cut you can take it off the mat. So now comes the fun and time-consuming part. You need to weed, or remove the extra vinyl. I find it easier by taking the extra around the edges before doing little details then I use the picture on my computer to help me find what I need to weed out inside the image.
Not that is done you want to arrange your shirt and heat transfer pillow right where you want it. It is important that you wash and dry your shirt without fabric softeners before continuing.
Personalized Gift Basket for $25!!
Welcome back! I have been planning this post for a little while but had to wait to post it. I made this gift basket that I was super excited about but didn’t want it to get back to the couple. So let’s jump right in.
Personalized Starbucks Cups for $5!?!
Thank you for joining me again today. If you want a personalized cup but don’t want to spend big bucks then you have come to the right place. I am a barista at Starbucks. We are encouraged to use reusable cups for our drinks while we are working to reduce the amount of plastic that is thrown away and to save our Earth. In the past, I have tried a couple different designs on my cup and haven’t found one that I absolutely loved and have had problems with the vinyl bubbling. So this morning I decided to take a different approach. If you have seen any of my recent posts you know that Autumn is my favorite season. So I decided to do an Autumn inspired cup. You can see what came up with below:
HTV? What is that?
Hi everyone! So today I’m going to talk about HTV. What is HTV? You may ask. It stands for Heat Transfer Vinyl or simply iron-on vinyl. When you have a Cricut the sky is literally the limit for all the different things that you can create. I have to admit that when I made my first couple of shirts (Pictured below) I was terrified.
I had no idea what I was doing and everyone was using their fancy easy press. The trick that I have learned is patience. To use a traditional iron is time-consuming, however, it works just fine. You need patience also with yourself. When you first start designing and apply your t-shirts there are going to be mistakes you will make. You can’t let those mistakes discourage you from your goal. You have to learn from them and try again. That is how we learn everything from walking to our chosen trade. This is no different and you will get there if you keep going.
If you are new to the Cricut world and are using your home iron it is important to know that for most types of vinyl (all the ones that I know of currently) require you to set your home iron to the highest setting. You also need to set it to the DRY setting. You NEVER use the steam setting when doing an iron-on transfer.
Also, make sure that you wash your shirts and dry them without fabric softener. You want to get the coating off the shirt that comes from the manufacturer. If you use fabric softener it is again putting a coating on the clothing that will give you trouble.
When using the older style iron on transfers the idea was to keep the iron moving. That is not the case with HTV. Instead, you want to press the iron down for 15 seconds before lifting it up and moving to a different area. This will prevent wrinkles in the fabric and vinyl.
If you are doing multiple layers of vinyl you must be careful. When you weed the vinyl it comes on clear transfer tape. Please, please, please learn from my mistake and make sure the clear plastic from a different section is under the vinyl. I cannot tell you how many times this happened to me because I was in a hurry.
Most importantly have fun with it! We craft to calm our anxieties or to relax. We don’t want to stress out so much that it no longer is fun. We want to enjoy the destination, or finished project, for sure but we also want to enjoy the journey as well. Before I close out for the day I want to share with you another shirt that I made at the beginning that I am proud of. It gave me so many problems, such as putting the vinyl on the clear transfer tape, but in the end, it was worth it and is one of my favorite shirts. Until next time, stay crafting my friends!
Super Smash Trophy!?!
Hey guys! So I have another exciting post for you today. So my husband today is having a super smash tournament with his friends today. So earlier this week he asked me if I could make him a trophy to give to the champion of the tournament. I thought about it for a couple days and looked online trying to find some sort of inspiration…well I didn’t find very much. I found maybe 2 trophies and they were 3D printed or you could buy it on Etsy for $30. So I thought to myself how could I make something that wouldn’t break the bank? So this is what I came up with.
Fall in love with Autumn
Hello everyone! Welcome back to my blog. So today I wanted to show you something else that you can make with the Cricut. This is probably my new shirt. You may not know this but Autumn is my FAVORITE season. I love the crisp air and beautiful leaves. Basically, I just love everything about it. Since Autumn officially starts on Monday I wanted to make a shirt in preparation. So here is a picture of my finished product.
This may look complicated at first but it is so worth it. The words in black are all 1 piece so that makes it easy. The leaves and words on the sides are in four different colors. I used orange, gold, medium yellow, and medium/dark green. The leaves are very easy to apply. The hardest part of the project is trying to align the “I live for autumn” and keep it straight but once you have it, you’re golden. The shirt is antique cherry red by Gildan that I bought at Michael’s for $2. If you are looking for the SVG file, you can find it here. That’s all for today. If you have any questions please send me a message. Talk to you soon!
New Favorite Craft!
Hello everyone! It’s been a while! Things have been super crazy but I’m back. I wanted to share with you something, a device that has changed my crafting life forever. That is the Cricut Explore One. Yes, it is an older machine but it is AMAZING! I have always wanted a Cricut especially when I started doing card making but they were just so expensive. I was looking through the local facebook marketplace and I found one for $80. Since then I have done so many different projects. So from now on, I’m going to share some of the different things I have created. If you wanted a tutorial on how to make these then please let me know and I would love to make one for you. Today I want to share with you my very first project.
The best part of this project is that it is great for a beginner and it is inexpensive. You can get these reusable cold cups from Starbucks for about $3. Then all you need to do is buy Permanent Vinyl.
May the Fourth Be With You!
Hello and happy Star Wars day! So this day is all about remembering the amazing movies that started it all and became a legend. I am not going to lie, I am a super nerd and love Star Wars. I will never forget the first time that I watched it and I have never stopped watching it. Though over the years Star Wars has seen many changes from the different Trilogies and so forth it is something that one and all love.
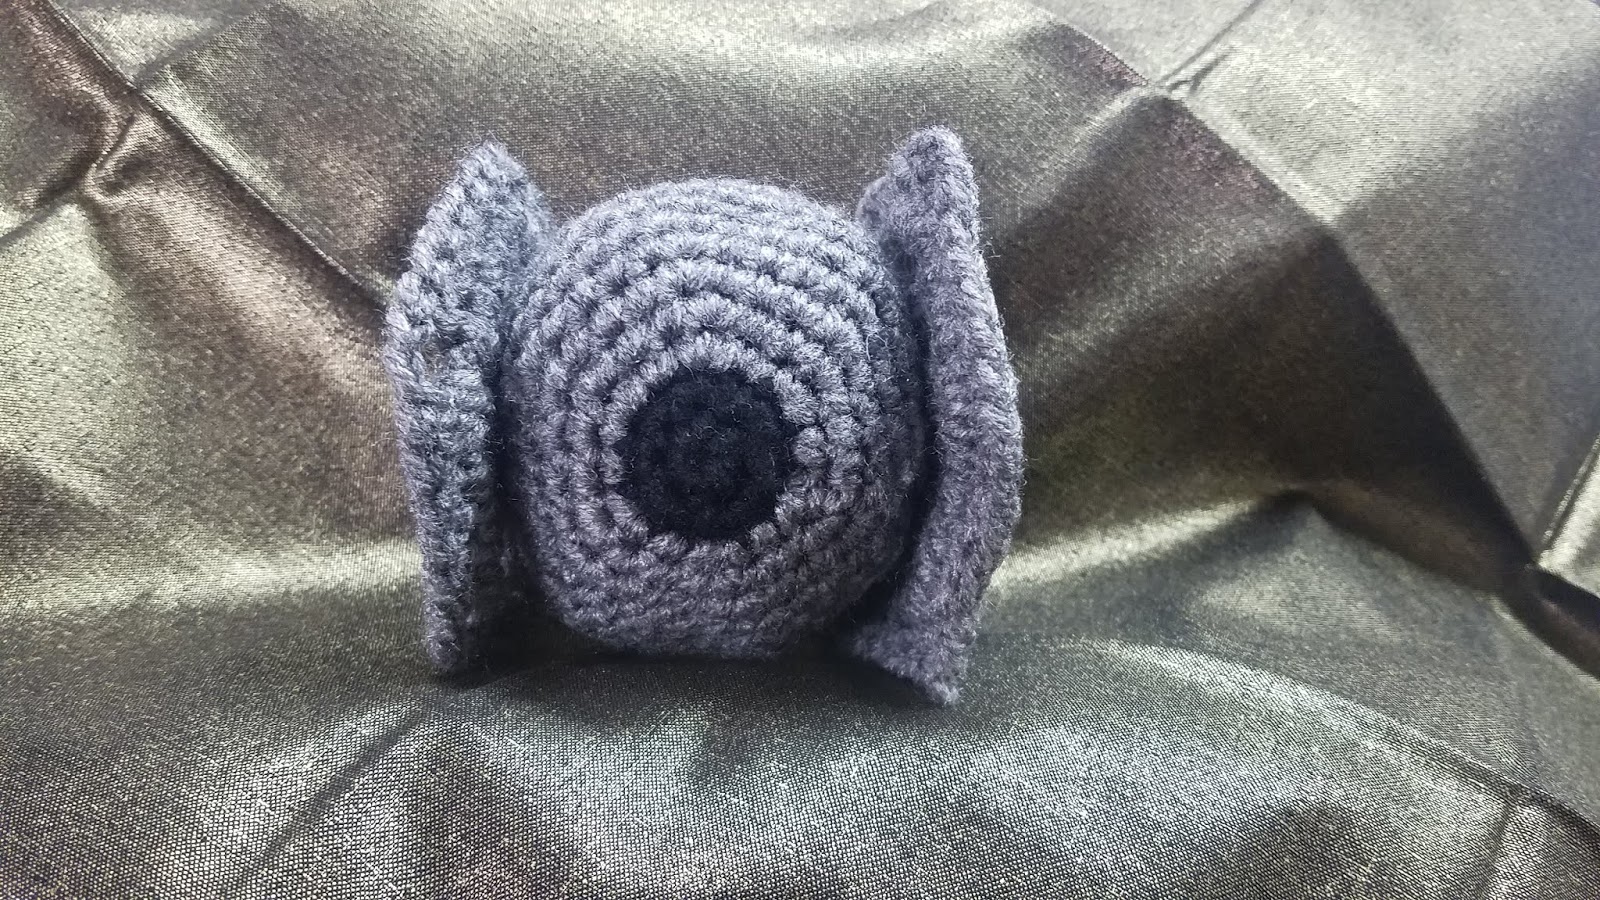
That being said today I have a very special video for you, how to make a TIE Fighter Amigurumi. You can watch the tutorial on my youtube channel by Clicking Here.
However, you can find the written pattern below:
Fighter Amigurumi
by Jasmine’s Creative World. You may not sell or claim pattern as your
own. You can make and share or sell with written credit to Jasmine’s Creative
World. For any questions please contact: jasminescreativeworld@gmail.com
G – Crochet Hook
Black Yarn
Dark Gray Yarn
Fiberfill (Or something to stuff in the cockpit)
Yarn Needle
Special Stitches:
Sc inc: Place 2 single crochets in the same stitch.
insert hook into next stitch and pull up a loop. Yarn over and pull through all
three loops.
(18sc)
times (24sc)
times. (30)
times (36)
times. (42)
of double crochets and chains. Sl st to ch3
around putting 1dc in each double crochet and (dc, ch2, dc) in each chain 2
space.
1dc). Continue around You should have a total of 6dc between the chain 2
spaces. Complete the last ch2 space like normal then dc into last double
crochet then slip st to top of chain 3.


