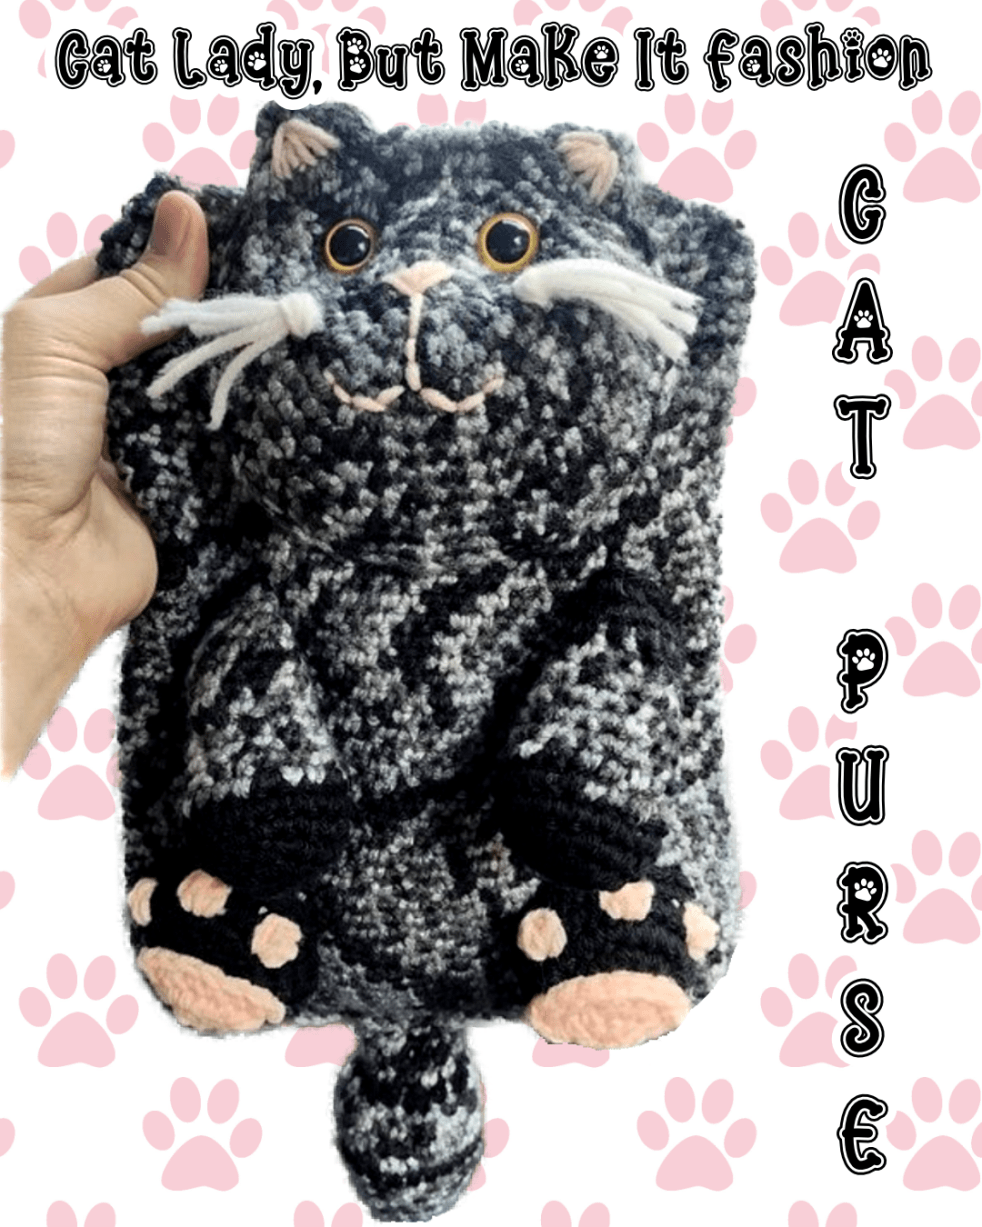
So picture this: You are going to a cat convention (a cat con if you will), you want to enjoy all the things that the show has to offer, but you have no where to put your stuff. You don’t want to carry your big regular purse around for hours, and it isn’t in line with the theme of the event. So what do you do? Near the end of 2025, I had this same problem. I wondered what I could do but nothing felt right. Then I saw this cute image of a cat purse online. It was adorable and instantly stold my heart so I knew I had to make it. The problem? The picture was generated by AI and no real pattern existed. The solution? Make my own pattern! Here is how it looked in the end and let me tell you, I’m so pleased with how it came out!
The first thing that I knew for this pattern is that I wanted it to fit my wallet. My wallet is really big, and it’s hard to find a smaller purse that will accommodate it. The other thing I knew was that I wanted to spend as little as possible to make it, which meant I had to use things that I already had at my house. I was looking through my yarn stash, trying to come up with something that I could use. I recently purchased a yarn winder so I have been going through some of the yarn that I have had for a while and found this beautiful grey and black variegated yarn. I wasn’t sure what the pattern would turn out like but it was worth a shot so I grabbed my 5mm crochet hook and got to work.
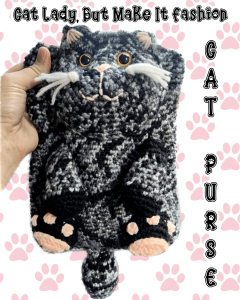
I started with a chain for how small I wanted the bottom and connected it to make a ring. I did a slight increase on each side to achieve rounded corners and then worked the rest in a round until I reached the desired length. I loved how it naturally had some tabby stripes in there and this bag reminds me of my beloved kitty, Haruka. When I got to the top, I did some decreases to round those corners too. With that done, I had an opening in the top and bottom to do the other pieces.
Next, I moved on to the back feet. I didn’t want them to blend in with the main part of the bag so I did them in a solid black of some yarn I had left over from another project. I started out with a circle and waited until I got it to the size that I did a couple of rounds of single crochets to get them to be 3D then I worked on the toe beans, and isn’t pink toe beans the best? After I got each of those attached to the main back foot, I worked on attaching the foot to the back being careful not to close the bag. I added some polyfill before sewing it on completely.
For the front feet, I started off with the solid black yarn to match the bottom feet and then after a few rows switched to the same yarn that I had used for the main part of the bag. Afterwards, I filled them as well then sewed them onto the bag at an angle so that they would fold in the middle just like when a cat is loafing.
For the head, I made a basic big circle then embroidered the nose and mouth on it. I then figured out where I wanted the ears to go so for the last row I added those and had a long tail to attach it to the body. Then I figured out where I wanted to attach it to the bag. I used some safety eyes that I already had and put it through the circle for the head and the body of the bag to keep it attached. Next it was just a matter of stuffing as I went until I got it the way that I liked it. I filled it more around the nose and mouth for that real 3D feeling then embroidered pink on there for the ears.
Next, I needed to do the tail, I was running out of yarn and I wanted to tie the black and grey in together so I did some stripes for the tail every couple of rows I would alternate them. When I was done I left a long tail which I used to sew the tail on and then close the bottom of the bag.
I finished it off with lining the bag and sewing some hidden D rings in the bag so that way I could use the strap from my regular purse as a crossbody bag. In person, you can see more of the 3D detail and this was probably one of my favorite makes ever and best of all, I didn’t even use a pattern so if I could customize it to what I wanted.
If you have been looking for a sign to experiment with crochet, let this be it: DO IT! Sometimes it won’t work out and that’s okay, just rip it out and try again because there is nothing more fun then getting your creative juices flowing. Until next time, happy crafting!